Here is how you can run CHKDSK to check your Hard Drive for errors
In the age of smartphones and tablets, most of our devices have moved on to Flash Storage or SSDs (Solid State Drives). This shift not only provide for blistering speeds but is also much more reliable than the previous format – hard disk drives.
However, for the most part, a lot of us still rely on Hard Disk drives – those spinning disks with huge TBs of storage spaces as the hard disk format is much cheaper. But this aging format has its own share of problems including some pretty annoying disk errors.
What is CHKDSK?
CHKDSK (short for Check Disk) is a Windows utility that has been around in Windows for more than a decade. It can not only check the integrity of your disk but also fix various file system errors you will face when using a Windows laptop.
The CHKDSK utility is highly recommended in case you face any of these boot errors,
- 0x00000024
- Various blue screen of death errors
- NTDETECT failed
- Fatal error reading boot.ini
- NTOSKRNL.EXE is missing or corrupt
- 0x0000007B
- 0xc0000001 on a Windows Vista computer
- 0xc000014C on a Windows 8 computer
As a general rule too, it is recommended to run CHKDSK from time to time to check if there are any integrity errors.
In this guide, we will take you through the process of using CHKDSK for detecting and diagnosing any disk issues.
How-To Use CHKDSK
In the latest versions of Windows, there are two ways you can run CHKDSK. Here, we will demonstrate both,
Note: You will need Administrator privileges for this guide. To check if you have Administrator rights or not, you can use our guide over here.
Running CHKDSK from My Computer
- Open My Computer.
- Right-click on the drive you want CHKDSK to scan. For example, we will choose D:.
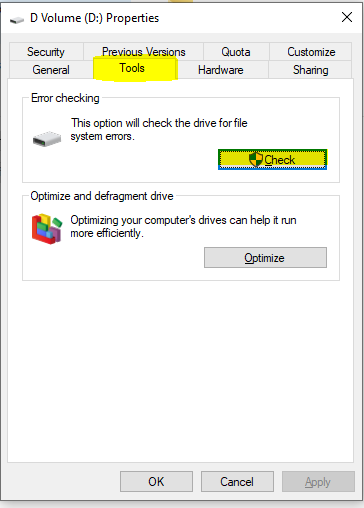
- Click on Properties and go to the Tools tab.
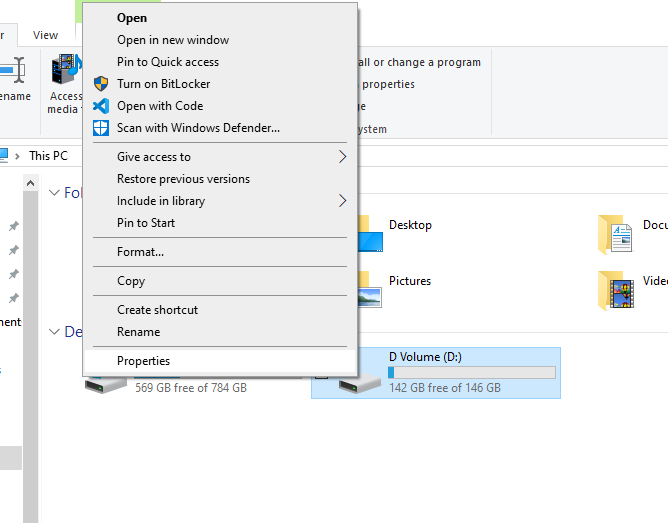
- In the Error Checking section, click on Check, as shown in the screenshot below.
- If Windows hasn’t found any issues with the drive, it will show you a message saying that it hasn’t found any issues and you can still scan the drive if you want to. Click on Scan drive to proceed with the check.
It will scan your drive and you can let it run in the background. Once it’s done, it will give you two options,
-
Your drive was successfully scanned Windows successfully scanned the drive. No errors were found.
-
Restart your computer to repair file system. You can restart right away or schedule the error fixing on next restart.
That’s it.
Running CHKDSK From Command Prompt
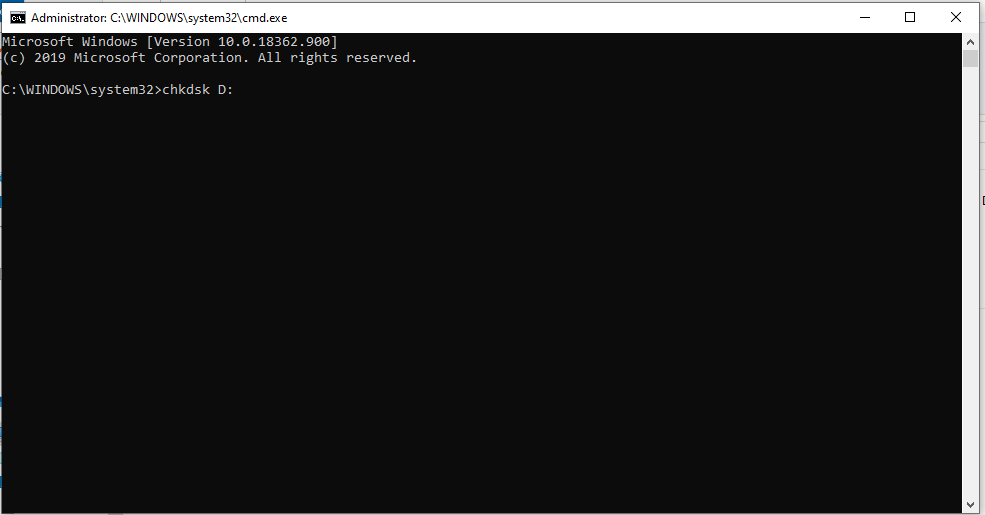
- Open the Command Prompt in elevated mode (use our guide over here).
- Run the following command,
chkdsk D:
This will simply scan the D: drive and show you the results. For additional configurations, like telling chkdsk to also fix any errors it faces locate for bad sectors and recover any readable information, you can also provide it with additional parameters.
- drive – specifies the drive that you want to chkdsk
- /p – Performs an exhaustive check
- /r – locates bad sectors and recovers readable information
- /f – Finds and repairs errors
- /x option will force the volume you’re about to check to be dismounted before the utility begins a scan
You can use the parameters and run an exhaustive check and try to fix any errors using this command,
chkdsk D: /f /r /x
