
Here is how you can Enable or Disable File Indexing in Windows
There are tons of differences between Microsoft’s Windows and Apple’s Mac operating system and both have their pros and cons. However, one feature where Mac has been way ahead of Windows is how it has handled its search feature, allowing you to quickly search using the Spotlight feature. Up until Windows 8, Microsoft didn’t really have a good built-in search tool to rival it.
In the latest versions of Windows, there is a built-in search feature that is accessible from anywhere inside Windows and you can also press WINDOWS + S to open Windows search or just press the WINDOWS key and start typing. Thanks to Windows search, you can not only search for installed applications and programs, but you can also search for files or directories instead of opening the Windows Explorer and manually navigating to find the particular path/file.
This is possible thanks to an indexing service inside Windows, which constantly runs in the background and keeps an index of every new file/directory entry you make and keeps a record of where it is stored and some details. When you search for it, it quickly searches in that index and allows you to open that file directly or go to where it is placed.
The indexing service is constantly running in the background so it can also consume a portion of your PC’s resources., and sometimes can even significantly affect your PC’s performance. Fortunately, you can choose whether to keep this service running or disable it if you want to free up your PC’s resources and improve its performance. The service is best suited if you have an HDD as searching an HDD is much slower. If your PC uses an SSD drive then we recommend keeping the service off.
Moreover, you can restart it if your search isn’t working fine. Additionally, you can also configure the service to only search in specific folders.
Here is how you can do it,
Customize Windows Indexing
- Press the START button and type Indexing Options and click on the search result.

- It will open the menu for Indexing, showing you the total number of indexed items, the folders that are Included, the folders that are Excluded, etc.
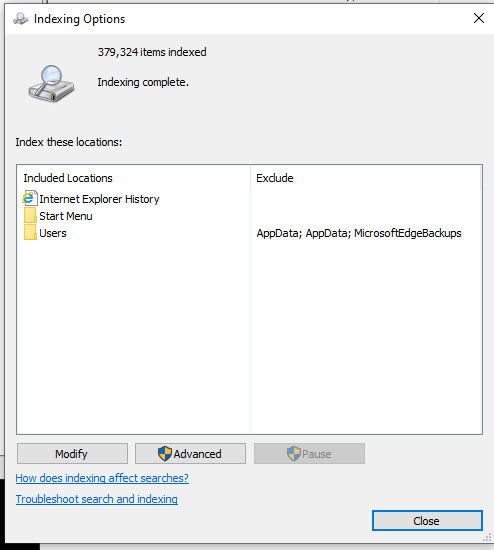
- Here, you can choose which locations you want to include by clicking on Modify and searching for the directory you want to include. You can also choose to exclude specific folders inside the directory you have included.

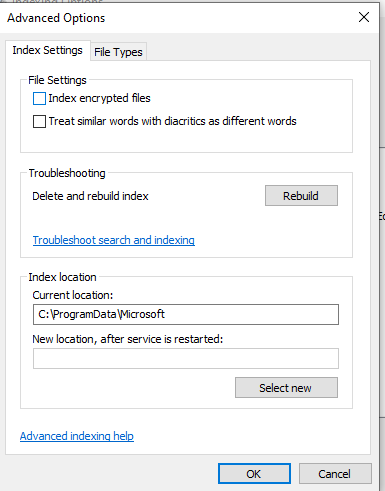
- For more granular control, click on Advanced options. Here you have the option to choose if you want to index encrypted files, choose the exact types of files you want to index (based on extensions), or even Delete and Rebuilt the entire index from scratch.
Turn off Windows Indexing on a Specific Drive
You can also choose to disable Windows Indexing on a per-Drive basis instead of completely turning it off. This will speed up your Windows Search for the other drives as it will have to go through a much smaller index. Here is how you can do it,
- Open This PC.
- Right-click on the drive you want to disable indexing for and click on Properties.
- Go to the General Tab and at the bottom, uncheck the checkbox for ‘Allows files on this drive to have contents indexed in addition to file properties’.
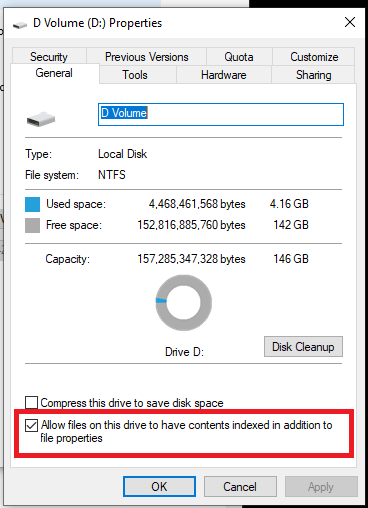
- Click on OK.
That’s it. Windows should automatically unselect the drive from Indexing, speeding up your Windows Search.
Disable Windows Indexing Service
The last resort and the best option to completely disable Windows from Indexing any of your files. You can do it by accessing the Services Manager in Windows and manually disabling it. Here is how you can do it,
- Press the START button to open Windows Search and type Services and click on the search results.
- Scroll down to find Windows Search in the list of services. Right-click on it and click on Properties.

- Click on Stop to stop it temporarily. However, if you want to prevent Windows from automatically starting the service when it boots up, you can click on the Startup type dialog box and click on Disabled.
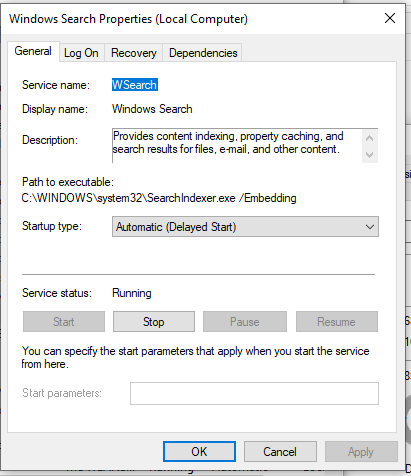
That’s it. However, do keep in mind that this will also prevent Windows Search from working as per normal.
