
What is God Mode and how to activate it in Windows
Microsoft’s Windows is a general-purpose, GUI(Graphical User Interface) operating system. Designed for all kinds of users, from business users to casual (and even pro) gamers to teachers, students, and even office workers. Therefore, it is filled to the brim with all kind of settings that can be tweaked to allow the user to customize their PC for their own needs.
However, the problem with this approach of packing in all the features possible is that it gets increasingly complicated. Not only does it make it hard to find everything, but it also means that there are tons of settings menus, each for a different kind of setting.
The latest version of Windows, Windows 10, is crammed with two types of Setting menus – one if the Windows Settings app, that is more like a smartphone-like, simplified settings app. For power users or users of Microsoft’s Windows 7 or older operating systems, you can still go to the Control Panel for more control over your Settings.
Fortunately, there is a third way of accessing Windows Settings called the ‘God Mode‘. It may sound way cooler than what it really is – a glorified Settings menu, which allows you to access all the Settings on your computer in one place. That’s pretty much what it is.
The process of activating the Windows God Mode is pretty easy and doesn’t require you to do any complicated stuff. In fact, all you have to do is create a new folder and paste a name. Here is how you can do it,
Activate God Mode in Windows
Note: God Mode is available in Windows 7, Windows 8, and Windows 10. Windows XP does not support this feature.
- Go to your Windows homescreen.
- Right-click on the screen and click on New, and then click on Folder.
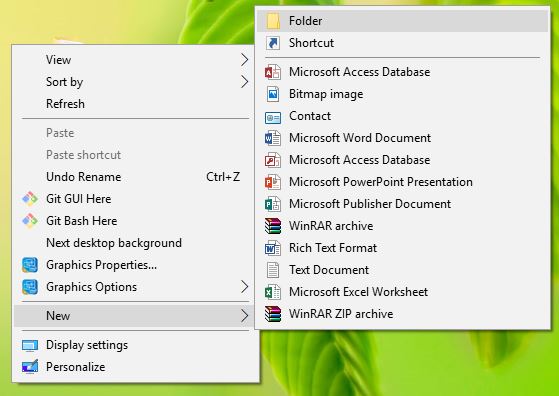
- Now, paste the following text for the folder’s name,

GodMode.{ED7BA470-8E54-465E-825C-99712043E01C}
- Press Enter to save the name.

That’s it. If you followed the process correctly, the icon for the folder should have now changed to the icon of a Control Panel, as shown in the image below. If it does, you can now also rename the icon to anything you want.
You can make as many God Mode icons as you want. It doesn’t necessarily have to be on the home screen either and can be made anywhere inside a folder.
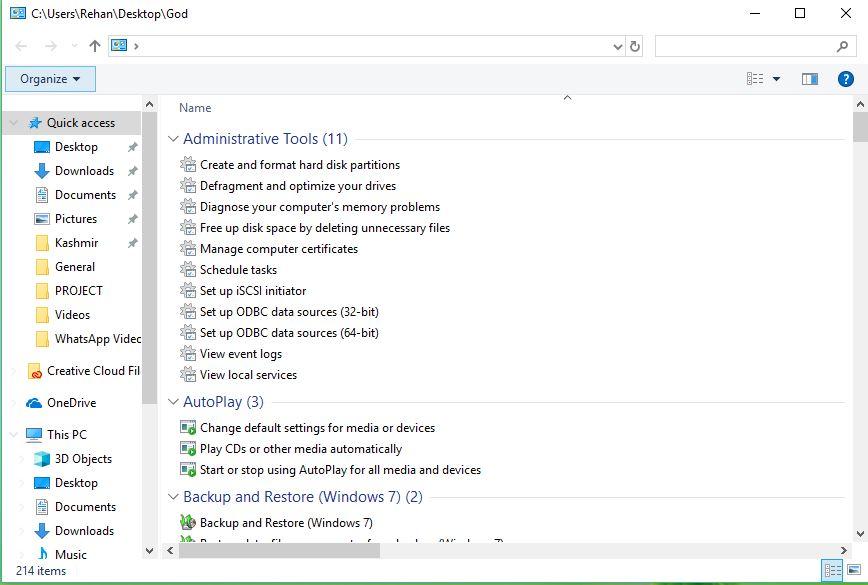
To access the God Mode, you can simply double click on the icon and it will open a menu, showing you over 40 different settings for your PC, compiled neatly in an alphabetical order for each section, from Administrative Tools and AutoPlay settings to Windows Mobility Center and Work Folders.
It may not sound like much but if you are a power user who likes to quickly access all the settings instead of navigating through menu after menu to find the setting you are looking for, the Windows God Mode can really be a blessing for you.
Additionally, Windows also allows you to create several other God Mode-like shortcuts to other settings for your PC. While some have been deprecated over the years, some can still be made by simply pasting the given string. Here is a list of some of those,
- RemoteDesktopConnections.{241D7C96-F8BF-4F85-B01F-E2B043341A4B}
- PowerPlan.{025A5937-A6BE-4686-A844-36FE4BEC8B6D}
- TaskbarIconSettings.{05d7b0f4-2121-4eff-bf6b-ed3f69b894d9}
- WindowsVault.{1206F5F1-0569-412C-8FEC-3204630DFB70} –
- Network.{208D2C60-3AEA-1069-A2D7-08002B30309D} –
- NetworkedProgramInstall.{15eae92e-f17a-4431-9f28-805e482dafd4} –
- WindowsFirewall.{4026492F-2F69-46B8-B9BF-5654FC07E423}
- WirelessNetworking.{1FA9085F-25A2-489B-85D4-86326EEDCD87}
- Printers.{2227A280-3AEA-1069-A2DE-08002B30309D} –
- MyComputer.{20D04FE0-3AEA-1069-A2D8-08002B30309D} –
- DefaultPrograms.{17cd9488-1228-4b2f-88ce-4298e93e0966}
Just create a new folder and copy/paste the name given above exactly and the icon should change to the respective settings. If it doesn’t, you may not be doing it correctly or the option may have been deprecated for the given program.
